

Newslist, a perfect theme well designed for magazines, blogs and news sites. It also fits perfectly on different niches websites like sports, travel, technology, fashion, politics, entertainment, and more. Whether you can keep this theme in a multipurpose category that suits all types. If you are in search of an elegant theme for your site then no other theme can beat Newslist theme.

How to install and activate NewsList
I will share you the simple and easy steps to install and download Newslist. Get ready to take full advantage of all the available features.
First of all, thanks for the purchase. After you purchase this Newslist pro theme from our risethemes.com you will receive a zip file for sure. Then you need to know the process of installing and activating in your site.

- Go to your dashboard and hover the cursor on the appearance. Over there inside the appearance panel, you will see the theme section at the top. Click on add new button at the top of the page.

After that, add themes page will open, and you will now see the Upload Theme button. Click on upload theme. Next, you have to click on the choose file button now.

Next, you locate your Newslist pro zip file and open it. Finally, you can install it by clicking install now button.
Tips to activate
- While activating the pro theme you will see the options.
- It will ask you to enter your license key. You need to click agree and activate license button.
- Next click on the activate license button. Now Newslist pro is activated.
Let’s Learn to Customize Newslist Pro
Now, you are almost done with installation and activation. All you need to do is customization. The major task while building a site is customization. if you are done with customization then your website is ready to be public.

After you logged into your WordPress admin area, you need to go to appearance and then click customize. Clicking on it will launch the Theme Customizer. Now you can see the customization setting (Newslist option, Site Identity, Background Image, Menus, Widgets, and Homepage settings, etc ) on the left of the screen and at the right, you will see the live preview of Newslist pro.
Customization features of Newslist pro
You can do lots with Newslist pro options. You can customize every feature beautifully and create your dreamt website. How does each feature work? let’s have a look at the Newslist options.

Header options: Here, you can add two header banner image to the right and to the left of the screen.
Color option: You will get unlimited and pretty color options here in this section. You can change the background color of the whole page. It also helps you to choose primary color, body text color, primary menu item color, header background color, link color, link hover color, and many more.
You can select a color for sidebar widget and content, footer widgets title and content, footer background, and copyright text and background color.
Top tag options: Newslist pro access users to enable and disable the top tag section. Here, you can select image for the top tag icon and add the title of your wish. Next, you will be able to change tag background and tag background hover color. Along with this, you can also change the section background and tag text color. Furthermore, It also allows you to show and hide time and date in a local and time zone format.
Latest post options: It can be enabled and disabled on the user’s wish. With the help of this feature, you can add the title and number of posts to display. In addition to this, you can change post, background and post hover color and select direction for slider texts.
Hero news: Hero news is a highlighter of a page where you can show news posts by category of your choice. You can also enable /disable autoplay, dots and arrows. It allows you to display the number of the slide according to your device. Besides this, You can increase and decrease the speed of auto-play slide and fade animation speed.
Slider options: You can enable or disable this option as per your need. If you like to enable then you can select a category to display the number of posts. It also helps to excerpt text length and add read more button for continue reading.
Post Options: Post options enables you to show the category of post, show writer’s name and photo and the date of the publication. This theme also allows you to show posts in rows.
Blog options: You can customize the archive meta order of posts by dragging and keep in order as per your interest.
Breadcrumb Options: These options enable you to choose the separator of your choice.
Sidebar Options: It helps to change the position of the sidebar: left, right and none. Also, you can show or hide a sticky sidebar and change the sidebar color.
You missed slider: This feature helps you to display the extra posts. You can add titles and display numerous posts with the category.
Footer options: You can fully customize the footer section here. You can add social menu , and edit copyright text as well.
Inner Banner options: It is only displayed when home page is the latest posts. You can add a title, and choose color, size, and alignment.
If you are done with your customization you can publish. Or you can publish during customization to see a live demo of your site and keep updating the changes you have made.
How to import demo content?
Elementor Template Install RT Easy Builder to import Elementor starter template from plugin directory. After successful installation, head on to Appearance -> Rise Demo Importer.

- Now, choose your desired template from the list. Click on the “Import” button.
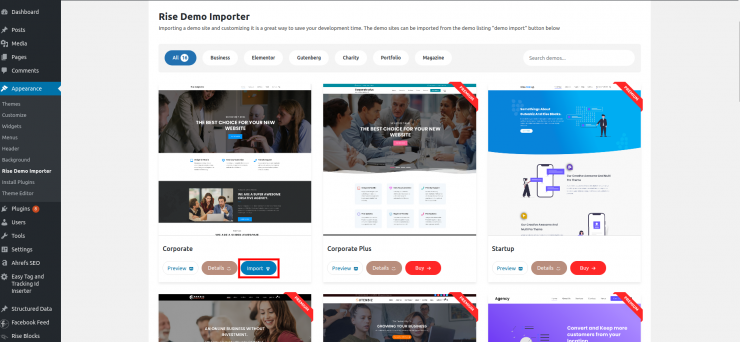
- It will then notify you with a list of necessary plugins for installation.
- Click on the continue and import button to import the template.

Gutenberg Template Install Rise Blocks to import the Gutenberg starter template.
- Create a new page then instead of selecting blocks, click on the “Get Rise Blocks Templates” button available on the sidebar options under Document.

- Rise Blocks Library will pop out. Select the desired templates from the list to insert the design on the page.
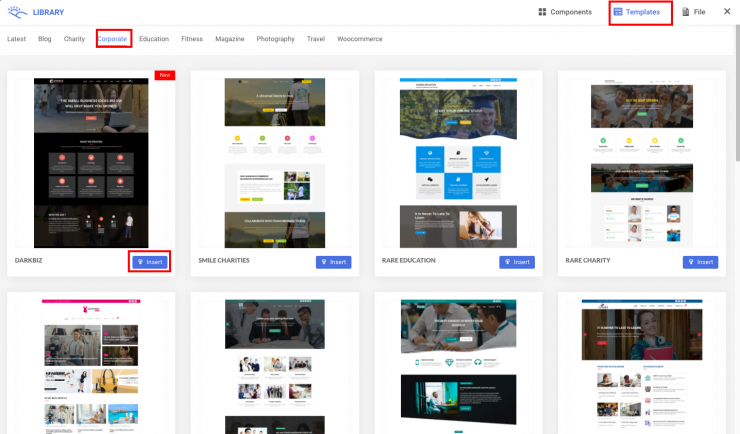
- Alternatively, you can import components only as per your needs. Click on the components available on the top right of the Rise Blocks Library. Select your desired component and then click the insert button.

- After you finish importing the template, change the content and hit the publish button to make it live.
Get Premium Version of Newslist