Teaching techniques and sharing knowledge we have is a great pleasure. Bloggers are the informal teachers who teach us, share ideas, and show us the way to solve issues and answer to all sorts of questions. Likewise, we will help you to create a WordPress blog in the same manner. You can also create a specific website for the blog where you can fully work on writing blog and contribute globally through writing.

WordPress blogs can be created for many purposes. Any text you see on google after a search is a blog post from a site owner. Users create blogs to describe products, inform, introduce, teach or share ideas on everything that the world requires. We can get anything we search on google because blog writers have contributed a lot. Thanks to WordPress for creating such a beautiful platform to educate, instruct and acquire knowledge.
Learn to add a WordPress blog post
Step 1
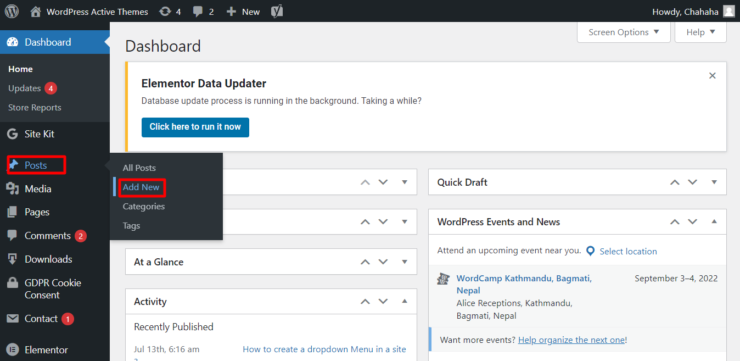
- From Admin Panel, go to posts.
- Hover cursor on Add New.

- You are now on a post page. You can create a post on your preference.
Step 2
Add Title and Content

- Add a title to the post you want to write.
- Create body content.
- Add images, videos, lists, tables, columns, buttons, image sliders, contact forms, or anything else you want on the post. It is only possible through a toggle block inserter or Add blocks icon (+).
Step 3
Post sidebar

The Post Sidebar ( Document Settings) is part of the WordPress Editor on posts. This panel is used to customize key aspects of the content.
It is located on the right side of the Editor screen. To enable it, click on the setting which is beside the publish button. You will see the post and block section. The left post tab features the settings for the entire Post you’re working on. The right tab is focused on the individual Block selected.
Status and Visibility options for WordPress blog post

You can select the targeted people for the post. If chosen :
- Public –if you select public it is visible to everyone.
- Private –if done private it is only visible to site admins and editors.
- Password Protected – Only those with the password will see the post if you choose the password Protected.
Step 4
Fix Publish date and Post Format
Publish: You can choose the date to publish or else it will automatically set the current date.

Post Format: Standard is the default post format. You can choose many formats like aside, gallery, video, status, link, quote, etc.
Stick to the top of the blog: A Sticky Post is the post placed at the top of the front page of Posts.
Pending review: The pending review checkmark indicates the post is ready for someone to look at it. This is marked in the list of posts as Pending and will also appear in a filter for Pending posts.

Step 5
Choose the Author and Template for the WordPress blog
Author: There can be many writers in different posts on websites. So this setting is useful to select the author of the related post.
Template: While better content enriches the post and template changes the structure and look of a post. Template differs depending on the theme you are using.
Step 6
Set Permalinks or Slugs

Permalinks are an important part of on-page SEO, These help increase the post’s ranking on search engines. As it is a permanent link to a particular blog post or category. The part of the link that automatically follows the title, is also known as the post slug or URL slug. It can be edited. You can set this setting in two different ways. One from Admin Panel-> Settings -> Post -> Permalinks. Or it can be done from the post that is available at the right of the Post Section Panel-> Permalink.
Step 7
Add categories for the post

What is your post category? You can add categories and clarify directly in short what the post is based on. It gives viewers the gist of the post.
At the right of the post page on the post section, you will see categories.
- Click on Categories and go for Add New Category.
- Then write category name on the box of New Category Name.
- If you want to add your post under parent category you can select parent category.
Step 8
Add tags for the post

Post-related terms are added for tags so that viewers can reach your post with ease. You can get tags below the category on the post section at the right.
To add tags, you should write tags on the add new tag box. You can write multiple tags. You can separate tag words with commas or enter key. Previously-used Tags will autofill as you begin to type them.
Step 9
Choose a featured image for your post
Features image is the image that appears on your blog post that represents the contents or theme of a post or a page. It is also called a post thumbnail. It will appear at the top of the blog post,
- To set the featured image on the post, Select the post section at the right.
- Click on the Featured image.
- Then click on set featured image and choose the image you want to set for featured image.
Step 10
Add Excerpt

Excerpt is the post summary that will be visible with a link. An excerpt is a short snippet from your post that you can display in a list of blog posts on your website. Depending on the theme, this may appear in different places such as the homepage, search results, or the archive page.
If the excerpt is empty, WordPress automatically creates an Excerpt using the first 55 words of the Post. The benefit of using excerpts is to speed up WordPress because only a portion of each article will be loaded.
Step 11
Discussion

Discussion setting is defined as the interaction between the blogger and the visitors. Admin can control the posts that come in through users. You can allow or disallow viewers to comment on your post.
Further, you can choose to allow or not to allow pingbacks and trackbacks. Pingback allows you to notify other bloggers that you have linked to their article on your website. Somehow trackback is similar to pingback but has a minor technical difference. The difference between them is, that the trackbacks are manual whereas pingbacks are automatic.
Step 12 ( Block Section )
Change the color of the text and background
You can make your post colorful and attractive with colorful background and text. For this, you have to select the block you want to change for the background. Then choose the desired color. You can select different colors on different blocks.
Likewise, you can change the specific text color. Click on the text and select the color you wish.
Typography Options
Typography options let you change the font size, letter case, letter spacing, and drop cap of letters.
Sum Up
We hope, this informative, useful, and essential tutorial on a WordPress blog post helped you a lot. Further, we are assured that now you can create a blog post and set all required settings and features. Besides this, settings can be done from the Administration panel as well. From Dashboard, go to settings and set everything you want for blog post.
In fact, users not only write content but also style and design every part of a post. It accesses you to add anything you want within a post. Also, you can work on speed, traffic, and SEO. Moreover, you can have a real-time experience of the site’s appearance before publishing any post.

