

Thinking of launching an online store? Woocommerce Plugin can turn your normal website into a profit-making professional eCommerce store with its outstanding features. You can only take full advantage when you are able to configure all the WooCommerce settings.
You are at the right place. We are going to share with you everything you need to know to set up your online store using Wocommerce. WooCommerce setup is a quick, efficient, yet powerful, flexible, and complete e-commerce plugin for WordPress. You can set up WooCommerce setting right off the bat with the help of this tutorial which includes every single piece of information, steps, and ideas for setting up your WooCommerce store.
Learn to Install WoCommerce Plugin
There are millions of miscellaneous websites built in this universe using WordPress. Woocommerce plugin has become an integral part of those websites that aim to sell products online. If you are planning of creating a site, definitely you might already have a registered SSL Certificate, domain and purchased web hosting for your site. Then the next step is to install an ideal and matchable theme and plugin for your website. Have you installed Woocommerce Plugin?
- Alike installing a theme, you should follow the same procedure.
- From your WordPress dashboard, go to Plugins>Add New.
- Search for WooCommerce, You will see WooCommerce on a screen.
- Click on Install Now button and Next Press Activate button to activate.
- Then Set up and configure your store.

How to configure General Settings?
Store Address

Firstly, you have to set up your store location. Where is your physical store located? Locate the store’s country/state, city, or full address including a zip code. Tax rates and shipping rates use this location.
General Options

Selling location(s): You can choose where to sell your products. You can trade your products to any specific country or to all countries. Configure it as you desire.
Shipping Location(s): Likewise selling location, you can choose where to ship your products; Ship to all countries or specific countries. You can also disable shipping if you are not giving shipping service.
Default customer location: Default customer location tells WooCommerce what location to use as the default for new users. This can be your store’s location, or you can enable geolocation for more accurate results.
Enable taxes: It gives you the option to enable and disable taxes. Disabling taxes hides the tax settings page.
Enable coupons: Woocommerce comes with a Full-featured coupon system. It allows you to add multiple codes for a single purchase and create discount codes for customers as well.
Currency Options
This section let you choose the default currency of your store and currency position to the left or right. Also, you can modify the separator characters that WooCommerce uses for prices.
How to configure product settings?
WooCommerce Product setting has 5 other different sub-settings. Let’s begin with the first one.
General Product Setting

Shop Page: It accesses you to select the base or main page for Woocommerce. By default, it adds a shop page as the main page.
Add to Cart Bahaviour: Where do you want to redirect your customers when clicking on add to card? Determine where to redirect them; to their cart page or use an AJAX button.
Placeholder Image: It enables you to set the default placeholder image for products without an image. It can be a brand logo or an image of a signature product or service.
Weight and dimension Unit: It lets you set the measurement units your shop will use for the weight (Kg, g, lbs) and dimension(cm, mm, m, yd).
Reviews: It helps you enable product reviews. Further, you also have control over the reviews with verified buyers or anyone who visits stores.
Product Ratings: It enables you to add a star rating system for products. Customers who buy a product can leave a rating from one to five stars. Besides this, you can also set the compulsory star rating system for the customer who reviews products.
Inventory Product Settings
Inventory settings help manage the stock in your store. See, how each setting works.

Manage stock: When enabled stock management you will get various options to configure. If you turned off unticked (disable) Inventory and status for physical products must be entered manually.
Hold Stock(minutes): You can set the holding minutes for the customers during the product purchasing process. It holds only for unpaid products order.
Notification and Notification Recipients: Enabling notification helps you know the available stocks in the store and adding an email address on a notification directly sends a notification to a recipient in case of shortage.
Low stock threshold/Out stock threshold: The out stock threshold should always remain zero and the low stock threshold reminds you of the remaining ongoing shortage of stocks.
Out-of-stock visibility: This setting allows you to determine whether to show products if they’re out of stock.
Stock Display Format: You can configure it by displaying stocks in numbers, when low. or not showing stock quantities at all. Whether to display stock quantities or not, is up to you.
Downloadable product settings

This setting is for digital and downloadable products/items. If you sell physical goods you can skip this setting.
File download method: Woocommerce has forced downloads by default that is accessible only for purchasers, and direct links are hidden. Contrary to forced, X-Sendfile or X-Accel-Redirect supports larger files and requires the hosting provider’s support. Redirect only is insecure and unsafe because the download URL links the user to the file.
Access Restriction: Tick the checkbox if you wish to grant access to files when orders are Processing, instead of Completed. On the other hand, Allow if you want users to be logged in to download files. But it doesn’t apply to guest users.
Filename: This setting of WooCommerce adds additional randomness to the filename to prevent link sharing.
Approved download directories
This is the new feature added to Woocommerce 6.5. to help manage the storage of the downloadable items. Along with this, approved directories can be added, edited, or removed. It is also possible to disable or enable this feature entirely.
Advanced

The advanced setting comes with a product lookup table which can be used for shop catalog display and filtering. If you turn on update the table directly upon product changes, instead of scheduling a deferred update that determines how the lookup table will be updated whenever a product is created or updated.
Configure WooCommerce Shipping
The next section in the Settings page of the WooCommerce plugin is the Shipping one. It has 3 sub-settings: Shipping zones, shipping options and shipping classes.
Shipping zones
Click on add shipping zone to add the zone name, zone regions, and add shipping method. You can configure unique shipping rates and methods for each zone. There you can choose a shipping method between flat rate and free shipping or local pickups.
WooCommerce allows you to modify the name of the shipping method and determine whether it’s taxable. Likewise, you can also set a specific price that will apply to each purchase.
Shipping Options
WooCommerce further comes with shipping options that include a calculator, shipping destination and debug mode. Let’s see what each setting does.

Calculations: It helps you enable the shipping calculator on the cart page. Customers can see the shipping cost while dealing with the cart process. Also, it allows you to hide the shipping cost until the address is not mentioned.
Shipping Destination: You will get three options to choose from here. You should determine where the shipping destination is: customer’s shipping address, and billing address, or force shipping to the customer’s billing address. The customer’s billing address is recommended for the default shipping destination.
Debug Mode: If you enable debug mode It will save Woocommerce from caching shipping zone data.
Shipping classes

Woocommerce shipping class is just a way of grouping products using the same method. To add shipping classes click on Add shipping classes on the right screen. Also, you can add a name, slug and description to the shipping classes.
Configure WooCommerce Payment Settings
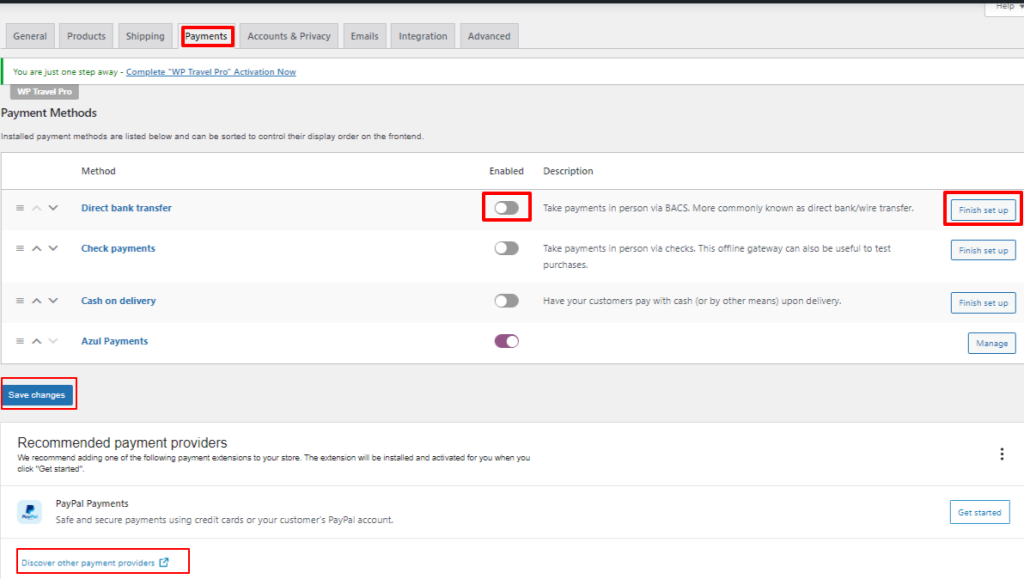
WooCommerce Payment settings let you enable the safe and secure payment gateway you prefer for your store. Woocomerce offers Various payment options; direct bank transfer, cheque payment, cash on delivery and Paypal by default. If it is necessary for your store you can enable it. Along with this, you have to press on finish set up for more required settings. For further WooCommerce extension, you can click on discover other payment providers.
Configure WooCommerce Account and Privacy Settings
This setting is where you can manage accounts and privacy settings for your eCommerce store. Let’s read how each setting works:

Guest Checkout: Basically, it enables customers to make a purchase without an account on your site or without signing in. The second option enables customers to log into an existing account during checkout. And Both options can be enabled at the same time.
Account Creation: This setting allows customers to create an account. You can allow customers to create accounts from the Checkout page or My Account page. In the same way, WooCommerce automatically generates usernames and passwords for new accounts.
Account Eraser request: This setting has two options available. If you enable the first option, user data will also be removed from your orders if they belong to the user being erased. The second option let you remove download data if it belongs to the user being erased. You can set it as your requirement and keep the checkbox enabled or disabled but we recommend enabling users to erase their data from your database upon request.
Personal Data Removal: With this option, users will be able to remove their past order data without your input.
Privacy Policy
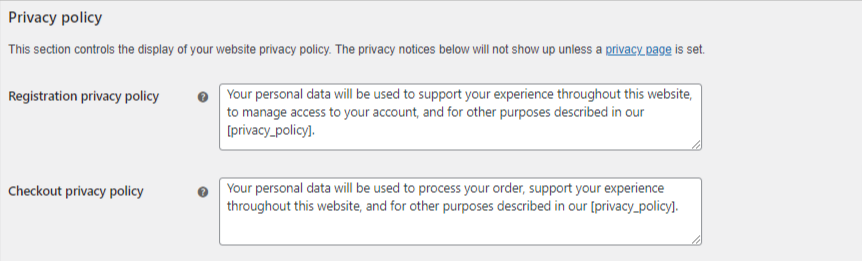
Privacy Policy allows you to set up registration privacy policies. It accesses you to add optional text to be displayed on the Registration page. Similarly, you can also add text for the checkout privacy policies field as well as a link to your page privacy policy page for more information about your website. WooCommerce by default has filled some sample text on both these fields, you can change on desire.
Personal Data Retention

Woocommers gives options to specify the duration you want to retain the personal data of customers. Here, you will see 5 different settings: personal data for inactive accounts, pending orders, failed orders, canceled orders, and completed orders. For each option, enter a number and choose the duration from days, weeks, months, or years.
WooCommerce Email Settings
Generally,here you can see all the emails WooCommerce sends to your customers, including emails for new orders, canceled orders, failed orders, orders refunded, password reset, new accounts, and more. In the Email tab in WooCommerce settings, you can click on any of the emails or click the ‘Manage’ button to see the settings for a specific email.

Email Sender Options: This option let you name the email sender and the address of an email sender.
Email Template: Woocommerce comes with the email template option where you can customize the default color of base background, body background, and background along with text color to match your logo color. Likewise, you can add Header text and footer text on emails.
Store Management Insights: This option helps receive “tutorial” emails from WooCommerce, in need of additional guidance.
WooCommerce Maxmind Geolocation Integration Setting

WooCommerce uses integration with MaxMind Geolocation to geolocate customers and display tax rates and shipping methods specific to a customer’s location. First of all, you have to enable geolocation as the default customer location from Woocommerce’s general settings underneath general options. Next, create a MaxMind account and finish configuring the MaxMind Geolocation in the integrations tab and create a MaxMind license key.
Now, come to this page and add the Maxmind license key to the required box. Also, add the location where the database should be stored.
Configure WooCommerce Advanced Settings
The Advanced settings in WooCommerce allow you to control your store’s page setup, plus enable third-party connections through the REST API or Webhooks. Within Advanced settings, you will see 5 sub-settings. let’s review each and clarify all of them.
Page Set Up Settings
Page Set Up
This setting enables to set location for essential pages in WooCommerce. WooCommerce will create shortcuts for these pages in order to properly configure them in your Online Store and link them to your “Home page“.

Cart page: This allows you to select the WooCommerce page that configures as your store’s “Cart page”. The page you select will be linked to the shopping cart page so that customers can see the items they have selected for purchase.
Checkout page: The page you select here will redirect to your store’s Checkout page. Under this page, buyers are able to add payment information and submit their orders.
My Account Page: Link the account page on this section so that customers can manage their accounts, review their orders, and edit their personal information.
Terms and Conditions: Here you can link the page of WooCommerce to configure as your store’s “Terms and conditions” page. Though It is optional.If you add this page, buyers will get a page of “I have read and agree to the website terms and conditions” checkbox during checkout. They should tick before they finish checking out.
Checkout Endpoints

This setting helps to reduce the number of pages and amount of content by handling multiple requests under the same page. By default, wooCommerce has configured the checkout endpoints. If you want to set up your custom endpoint values, set the unique endpoints in order to avoid interference and issues during the checkout process.
Account Endpoints

These account endpoints are included in your “My Account” URL to handle specific actions. Alike checkout endpoints if you wish to set up your own unique custom account endpoints be sure to avoid possible interference. That’s it.
Rest API

Rest API is the powerful part of Woocommerce that enables external apps to interact with your website data and make CRUD (Create; Read; Update; Delete) operations. Don’t forget to enable WordPress permalinks before getting started with Rest API. Click on Create an API Key button that will redirect you to the key detail page.
Fill up the details as required and next click on generate API Key. You will receive a “Consumer key“, “Consumer secret“, “QRCode” and a “Revoke key” option. The “QRCode” is particularly useful for mobile apps to directly scan it avoiding the whole typing/pasting process. From the red “Revoke key” button you can restrict access to your website’s data for any application using this key.
Webhooks

Webhooks are just HTTP requests sent to a certain URL usually in response to an event. Similar to Rest API, Click on the purple button” Create a new Webhook”. Now, you have to set up the required information.
Name: You need to enter a title of a webhooks. If you don’t it will automatically generate a name by default.
Status: It has three statuses available: paused, active, and disabled. Set it to “Active” status when you are ready for it to run.
Topic: Here, you will see so many options to choose from, Coupon Created Order Created, Product Deleted, Customer Updated and many more like this. If you select “Action“, you can see another field “Action Event” to add more information.
Delivery URL: In this section, you need to enter the URL address where a webhook event is to be delivered.
Secret: You can leave this blank or can add a secret key to generate a hash of the delivered webhook.
API Version: It allows you to choose your preferred REST API version which will be used in this webhook.
Legacy API
Enabling Legacy API will avoid an error after connecting Metorik to your WooCommerce store when it’s testing the connection. Do you know, The new alternative to the “Legacy API” is the “REST API” so it is deprecated and expected to be removed soon.
WooCommerce.com

Enable tracking helps you to collect information about your store such as your site URL, admin email address, your active payment gateways and shipping methods, active plugins, MySQL version, PHP version, etc. You can untick it if you want your store remains untracked, and no data will be collected. The next checkbox “Show Suggestion” setting will display your extension recommendations when ticked.
Features
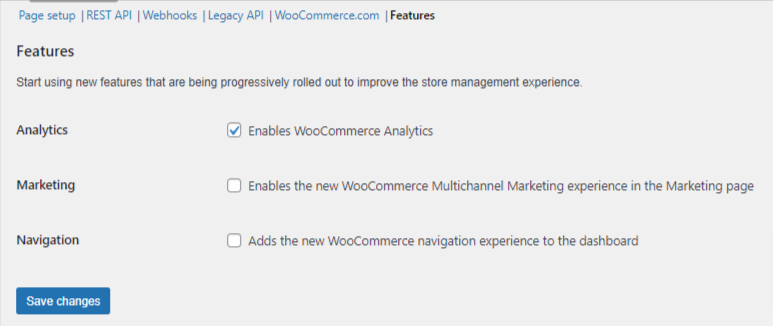
Well, this setting section let you check out new features that are still in development. To prevent your site from errors and bugs try these features on your testing site beforehand.
Finally, your Woocommerce setting is over. You have successfully configured WooCommerce settings and are ready to sell the product online. These Fundamental settings are basic and one-time settings so you can move a step ahead for a further procedure. We wish you very good luck with your ongoing business. We hope this tutorial helped you a lot with settings, In case of any confusion feel easy to ask us.